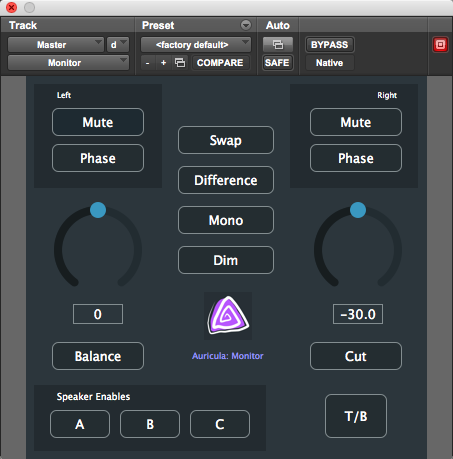
 Control Room Master Section includes:
WARNING: Improper use could result in LOUD signals.
- Dim
- Mono
- Cut
- Difference
- Balance
- Swap
- Mute L & R
- Phase Reverse L & R
- Volume
- Talk-Back Switch
- Speaker Select A, B, & C
Usage Notes:
Be VERY hesitant, maybe even PARANOID, about bypassing or moving these plug-ins to different inserts. LOUD sound or even feedback could result.
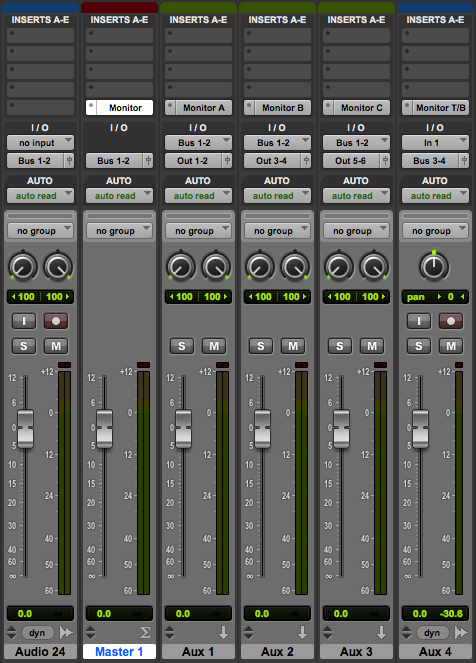
Suggested Setup. Use any number of AUDIO faders to feed your mix bus (in this example ‘Bus 1-2’). Use one MASTER fader to control you mix. Use AUX faders to add paths to the hardware outputs connected to your amps/monitors. Add one AUX fader for your control room talk-back back mic & feed this to your cue mix.

Bus 3-4 are being used to create your CUE mix. Route the mic in your control room through the ‘Monitor T/B’ plug-in. If using ‘Bus 1-2’, experiment with lowered control room volume until you are confident your mic placement will not result in feedback. Gradually raise the control room volume over time until finding an appropriate level. Bypassing the ‘Monitor T/B’ plug-in will send the mic level to the cue mix without attenuation all of the time.

Here, hardware outputs 1-2 are connected to your ‘A’ speakers, hardware outputs 3-4 are connected to your ‘B’ speakers, hardware outputs 5-6 are connected to your ‘C’ speakers. Bypassing any ‘Monitor X’ plug-in will send your mix to the speakers without attenuation.

Bus 1-2 are being used to create your main stereo mix. When bouncing, select Bus 1-2 for the output – do not select Out 1-2. If no speakers are selected ( A B C ), the ‘Monitor’ plug-in will affect the Bus 1-2 output – in this scenario, consider inserting it where ‘Monitor A’ is located in the pic above – caution: do this when your monitors are turned down, before music is playing. Do not move the ‘Monitor’ plug-in between inserts while music is playing or your monitors are turned up.
